Thursday, December 20, 2012
Alice by Tom Waits
It's dreamy weather we're on
You waved your crooked wand
Along an icy pond with a frozen moon
A murder of silhouette crows I saw
And the tears on my face
And the skates on the pond
They spell Alice
I disappear in your name
But you must wait for me
Somewhere across the sea
There's a wreck of a ship
Your hair is like meadow grass on the tide
And the raindrops on my window
And the ice in my drink
Baby all I can think of is Alice
Arithmetic arithmetock
Turn the hands back on the clock
How does the ocean rock the boat?
How did the razor find my throat?
The only strings that hold me here
Are tangled up around the pier
And so a secret kiss
Brings madness with the bliss
And I will think of this
When I'm dead in my grave
Set me adrift and I'm lost over there
And I must be insane
To go skating on your name
And by tracing it twice
I fell through the ice
Of Alice
And so a secret kiss
Brings madness with the bliss
And I will think of this
When I'm dead in my grave
Set me adrift and I'm lost over there
And I must be insane
To go skating on your name
And by tracing it twice
I fell through the ice
Of Alice
There's only Alice
Wednesday, December 19, 2012
Christmas Spiced Baking

To get in the Christmas mood I decided to do some Christmas baking. I haven't been to any Christmas parties as I'm not working and don't know many people here in France yet. Most of my fellow students are from not Christmas-celebrating countries and none of us really have big enough places to throw a party for everyone. If this was Australia we'd all head to the beach for a barbie but it being well and truly winter here, it's much better to head to the Christmas markets instead...if I could leave the warmth of the kitchen...
So here are my first two efforts, peppery spiced cookies and a panforte - the only type of fruitcake I seem to enjoy.

Panforte
Makes 1 x 20cm cake (about 16 servings)
This very special Christmas treat is surprisingly quick and easy to make. It looks wonderful dusted with icing sugar or left glossy and bejewelled and makes a great homemade gift. Just look at the ingredients, that's what it's all about - the fruit and nuts of your choice and why not? - a bit of chocolate in there too?
I normally loathe Christmas cakes as I'm not a huge fan of all that glace fruit, I think. But this one is completely different from those English ones. For a start, it's from Siena in Italy and now often features chocolate, which I'm not going to argue about. I've not been to Italy yet but have enjoyed this at cafes and people's homes in NZ and Australia. This one that I just made is my fabourite yet! It's chewy, irresistible and has a warm spice background that doesn't overpower the stars of the show, the fruit and nuts. You can choose the nuts you like - some people have used pecans, walnuts etc. And for fruit you may prefer candied citron to the figs I went with.
There are many versions of this recipe around so I made this one to suit my taste and what I had in the cupboards. Feel free to tinker with it to make it your perfect version!
Ingredients:
3/4 cup flour
5 Tablespoons of good quality cocoa powder
1 teaspoon ginger powder
1 teaspoon of cinnamon
pinch of ground cloves
1/4 teaspoon - 2 teaspoons pepper (2 t gives it a delicious little 'bite')
1/4 teaspoon red chilli powder (optional)
1 cup sultanas / dried figs etc
3/4 cup toasted hazelnuts, skinned*
3/4 cup of blanched almonds
zest of 1 orange thinly sliced (I actually swapped the sugar for orange marmalade instead)
160 grams honey (2/3 cup)
150 grams sugar (scant 2/3 cup)
100 grams dark chocolate (optional as cocoa already adds nice choc flavour)
Method:
Preheat oven to 150 degrees celsius (300 F). Grease a 20cm tart pan (if you have it, one with a removable base), line with a circle of baking paper (to do this, just trace the bottom of the dish onto the paper and cut out the circle a tiniest bit smaller than that!). Dust sides of pan with some cocoa powder. The traditional recipe uses communion wafers to stop bottom sticking in pan and now many chefs use rice paper but I've never seen that for sale. Normal baking paper works fine, we just can't eat it!
Put the honey, sugar and chocolate (if using) in a saucepan. Put everything else in a big bowl and set aside.
If you have a sugar themometer, attach this in the saucepan. If not, get a small bowl of water and a fork ready next to your stove (to test sugar syrup consistency).
WARNING: In case you forgot, boiling sugar can give you terrible burns so heating the sugar must be done carefully, and not by kids! DON'T test the syrup on your finger - use the bowl of water to drop it in!
Now heat the sugar and honey (and choc)until just boiling, stirring only enough to dissolve sugar. Now STOP stirring but continue to heat to 115 degrees celsius (240 F) OR, to test if the syrup is at the 'soft ball stage', dip fork into it and slowly lift - if it starts to form a sting this is a good sign. Or get a little syrup on the fork and drop into the cold water - if it forms a little ball that you can pick up (instead of disolving/disintegrating) it will be ready.
As soon as syrup is at 115 degrees / soft ball stage, tip it into the bowl of other ingredients and get mixing! This may take a bit of work as the mixture is very sticky and starts to harden quickly, but you want to get it all combined well so the fruit and nuts are well spread through the mix.
Tip mixture into the prepared lined tin and spread down with the back of the spoon. When slightly cooled (so you don't hurt yourself!) press down to smooth with wet hands. Now pop in the oven and bake for 30-35 minutes. Leave until cool enough to touch before removing from pan and removing paper. Rub the outside with powdered sugar, or, if you prefer, leave it as is. Place on a rack to finish cooling.
*To get the skins off hazelnuts, just quickly toast them in an oven tray and while they're still warm, rub them with a clean tea-towel to get off as much of the skins as you can.
To Store:
Wrap well in plastic wrap or wrap well in waxed paper. It keeps well for months, making it a great gift, treat to take on holiday or for singles / only sweet-tooths in the house it means you can bake it to enjoy at your leisure with no waste or guilt!
To Serve:
It is very rich so it is usually served in thin wedges (ideally smaller than I managed in the photo!) and enjoyed with coffee, a fortified wine or spirit like Amaretto. Very festive!

Spice Biscuits
(makes about 30-50 cookies, depending on cookie cutter size. I made 48)
These can be eaten any time of year, of course, but I usually crave something like these in the winter with a hot cocoa and maybe a roaring fire! Having changed hemispheres I now get to enjoy winter Christmas with these festive spices. Glorious.
Ingredients:
1 1/2 cups flour
1 teaspoon baking powder (optional*)
pinch salt
3/4 teaspoon of fine white or black pepper
1 teaspoon ginger powder
1 teaspoon cinnamon powder
1/4 teaspoon crushed cloves (I crushed 2 or 3 cloves with the back of a spoon)
110 grams (generous 1/2 cup or 1 stick) unsalted butter, softened
1/2 cup brown or muscovado sugar
1/2 cup white or raw caster sugar
1 large egg
You will also need
extra flour for rolling out
rolling pin
wax paper / plastic wrap
cookie cutters of whatever shape and size you like
a cookie tray for the oven
Method:
In a large bowl mix together the flour, b.powder if using, salt and spices. Set aside.
In a mixer (or in another bowl using a hand mixer) cream butter and sugar. Beat in the egg. Now gradually mix the butter mix into the dry ingredients (or the other way around).
Divide dough into 2 or 3 pieces and form into balls (it will be very soft and need a little flour dusted on the outside). Flatten the balls into disks, and store these between wax paper sheets (or wrapped in plastic wrap) in the fridge for a couple of hours or overnight. If you don't have much time to let it firm up in the fridge (it still needs SOME time or it will be TOO soft) I suggest you roll it out, not too thinly, and use a simple cookie cutter shape like a circle, as more intricate shapes will be difficult to remove from the cookie cutter.
When you're ready to bake, preheat the oven to 180 degrees celsius (350 F).
Dust the rolling pin and a sheet of wax paper (or a clean work surface) with flour.
Roll out the dough, adding flour as needed to keep it manageable. Cut out your biscuits using cookie cutters. If the dough is cold enough and not too thinly rolled, these will come out of the cutters easily. If the shapes are very intricate (like my leggy camel cookies), I suggest popping them back in the fridge for another 1/2 hr or so before cooking as softer dough will spread out quicker and you'll loose some of the definition.
Bake on ovenpaper on cookie trays for 10-12 minutes. Keep an eye on them as you don't want them browning, just getting lightly golden. Slide parchment paper onto a rack/wooden board so the first batch can cool while you use the tray to keep baking the rest.
These can be decorated with fancy icing patterns or glazed with eggwhite and sprinkled with coloured sugar crystals or anything like that. I kept these plain as I think they are pretty enough in these shapes without the need for extra decoration which might take away from the spices!
They keep well in a sealed tin or container (once cool!)

Sunday, November 11, 2012
Thursday, October 25, 2012
FLOWER
A rose will bloom, it then will fade...
I probably would have selected different music if I were the film maker but I still think this is incredible what Andrew Zuckerman has done. This video promotes his latest photography book, Flower.
I probably would have selected different music if I were the film maker but I still think this is incredible what Andrew Zuckerman has done. This video promotes his latest photography book, Flower.
Friday, October 19, 2012
Paloma Negra
I heard this song on the radio today and remembered how much I love it. A brilliant song featured on one of my favourite soundtracks - 'Frida' (also, watch that movie if you haven't already). x
as sung by Lila Downs
as sung by Lila Downs
Tuesday, October 2, 2012
100 years
This is brilliant and WONDER-ful. I love looking at the people and listening to the Dutch language. Just 100 people from 0-100 saying their ages. People are fascinating, eh?!


Monday, October 1, 2012
Persian Herb Omlette / Kookoo Sabzi

Some years ago I'd bought a gorgeous book of Persian cooking (with travel photos) for an ex-bofriend. It was one of those presents I secretly hoped to enjoy to, but he left the country with the book and not me. Nevermind, it was a little meat heavy anyway but I did love some of the recipe ideas there and when I saw a recent publication, Veggiestan, in our local bookshop, I had to check it out (buy it straight away). The name is a bit rubbish but there are plenty of great vegetarian recipes from or inspired by Middle Eastern cuisine. I've previously shared recipes from Arto der Haroutunian's wonderful books, but what immediately appealed to me about this new one from Sally Butcher is that is has lots of photos to inspire! The photos here are from my first attempt at this very herby omlette dish.


The author suggests this is 'great as a lunch or light supper option, with some bread and salad, or you can tart them up into a dinner party starter – but in Iran kookoo are most often used as a sandwich filling together with fresh herbs and spicy pickled cucumbers.
You can replace the coriander, parsley and fenugreek with a bag of sabzi kookoo dried herb mix, available from Middle Eastern supermarkets'.
As you can see in the top photo, I served mine with a yoghurt sauce (made with dill and garlic) and lots of salad for something fresh.

Serves 6 as a snack
1 bunch coriander (other recipes suggest dill, which I love)
1 bunch flat-leaf parsley
few sprigs fenugreek
1 small bunch spring onions
6 eggs
1 dessertspoon flour
½ teaspoon baking powder
salt and pepper
olive oil, for frying
Optional extras:
100g / 3½oz / 1 cup lightly broken walnuts, or
100g / 3½oz / 1⅓ cups soaked barberries, or
100g / 3½oz / scant ⅔ cup soaked raisins, or
100g / 3½oz / ⅔ cup toasted pine nuts
Trim and soak your herbs and leave to drain a while. Wash and chop the spring onions, and then chop the herbs. (If using dried herbs, soak them for 15 minutes and then squeeze as much of the moisture out as possible).
Beat the eggs well, and then blend in the flour, baking powder, seasoning and any of your chosen "optional extras". Fry the herbs and spring onions in hot oil for around 5 minutes, turning constantly, and then pour the egg mixture on top. Cook on a lowish heat for around 15 minutes, and then either toss the omelette or pop the pan under a hot grill for about 3 minutes. Slide on to a plate, and then cut into wedges. Enjoy hot or cold.
Thursday, September 27, 2012
Wednesday, September 19, 2012
Monday, September 10, 2012
Monday, August 27, 2012
Wednesday, August 22, 2012
Tuesday, July 24, 2012
Get Drunk
a great poem by Charles Baudelaire
The song at the end was just part of this clip, but even if you don't like Irish folk music, it does give that jolly vibe of having a pint and a laugh with mates at a cosy Irish pub, does it not? There are other versions of people reciting this but this is the one prefer and which I learnt by heart from listening to a Makem and Clancy casette tape when I was 14 (and not drinking but into poetry). The words below are someone else's translation - not exactly what's on the video; the original poem is in French.
Always be drunk.
That's it!
The great imperative!
In order not to feel
Time's horrid fardel
bruise your shoulders,
grinding you into the earth,
Get drunk and stay that way.
On what?
On wine, poetry, virtue, whatever.
But get drunk.
And if you sometimes happen to wake up
on the porches of a palace,
in the green grass of a ditch,
in the dismal loneliness of your own room,
your drunkenness gone or disappearing,
ask the wind,
the wave,
the star,
the bird,
the clock,
ask everything that flees,
everything that groans
or rolls
or sings,
everything that speaks,
ask what time it is;
and the wind,
the wave,
the star,
the bird,
the clock
will answer you:
"Time to get drunk!
Don't be martyred slaves of Time,
Get drunk!
Stay drunk!
On wine, virtue, poetry, whatever!"
Thursday, July 19, 2012
A Happy Event TRAILER
One of the last films I saw in Oz before moving to France...and it's French...and a little scary if you're a woman...


Thursday, July 12, 2012
Marley
The Herb. Lots of people have teased me for all the things I say 'no' to. At school, Ben Harper's 'Burn One Down' was frequently quoted to me: "Before you knock it, try it first, you'll see it's a blessing and it's not a curse". I had to admit that most of the music I loved, even the Beatles', was probably indebted to hallucinogenic inspiration. Easy to see the sense in it as an artistic tool.
I had my own reasons for not wanting to try it and hanging out with people smoking didn't do anything to motivate me - those nights were just so slow, and I felt our town was already slow and sleepy enough! (In fact, I was slow enough, too!) People took so long to say anything, or even to respond. People I meet now who've kept smoking a lot tend to have that slowness.
So I'm wondering if it's this mellow slowness of Bob Marley and his Rastafarian culture that the filmmaker is echoing in the feature-length documentary, 'Marley'. I enjoyed it, having got free tickets and a morning without work (and, like most people, just loving Bob Marley's music). A few people I spoke to liked the film to begin with but found it far too long. It IS long. Is it that the pace is too slow (without smoking?) or that our internet generation have rubbish attention spans who can't even watch a whole 4 minute clip on youtube? Perhaps try watching the documentary over a few nights, like a series...
Here's a 10 minute clip of an interview with Bob Marley in NZ (not in the film) so you can see what I mean
Here's a shorter clip (under 2 min)- the trailer for Marley.
One thing I came out of the film thinking was how amazing it was that one man could inspire so many people around the world and do so much, through his music, to promote good values. Amazing that such a man with such influence can appear to have been such a negligent parent. It must be frustrating for his children, especially his daughter interviewed in the film who felt she got to know her father more through the documentary than she had growing up. As with so many artists, what they offered the world was more than what they might have offered their families. But let's make the most of his gifts and let his inspiration live on.
On a very personal note, this is the song I wake up to most mornings, with my man singing it to me. He doesn't have Marley's voice but it does the trick - it not only gets me out of bed in a good mood but reminds me of the kind of person I want to be and how lucky I am to have someone in my life who reflects this and who brings out the me in me!
Saturday, July 7, 2012
Polisse Trailer - French with English Subtitles
This film 'Police' about the Child Protection Unit, can't help but be moving, given its subject matter. It was a good film with light moments to get us through, though the ending just seemed to leap into a genre of its own :( Still, a worthy effort from the writer, director and star, Maïwenn.
Wednesday, July 4, 2012
Turkish Rice and Lentil Soup
Good for cooking for oneself - we should try and treat ourselves to healthy, delicious food even in a hurry :)
Thanks to my old boss (also a vegetarian food fan) for this very easy and yum soup recipe. It's the kind of easy throw-together one that I've never had time to photograph, ...might one day....
Boil 2/3 cup red lentils in veg stock till mainly done
add bay leaves
add 1/3 c rice, almost cooked
Mix together:
tomato paste
turmeric
smoked paprika
chilli flakes
Add and cook another 5 min
Put baby spinach leaves in a bowl and pour over the soup.

Monday, June 25, 2012
Flamusse Bressanne (best apple tart ever)


This is my favourite apple tart recipe. What I love is the balance between the sweetness of the apples and sugar balanced by the freshness of the wine (if using) and the creme fraiche. The crumbly base, firm cooked apples and creamy set custard make for some wonderful textures, too.
There's a short version and a long version of for the method - depending on how many instructions you like. The short version goes a little something like this:
1. Knead together pastry ingredients into a dough, cool 1 hour+ then roll out and to fit tart dish and blind bake.
2. Glaze pastry to seal. When set fill with apples. Mix up custard ingredients and pour over. Sprinkle with cinnamon sugar. Bake centre of 180-200 degree preheated oven for 20-30 or until set.
3. Optional pretty finishing: Sprinkle with caster/powdered sugar and grill to caramelise top. Cover pastry bits w aluminium foil to prevent it burning.
It was shared with me by a Matthias, a lovely German guy who passed on this French style tart they called 'Flamusse Bressanne' or in German 'Burgunder Apfelkuchen'. I looked up 'Flamusse Bressanne' online to see how common it was and it seems that this is usually made without a pastry - instead making a custard with a bit of flour that sets into a nice mould for the apples. So up to you. I'm sharing with the pastry steps as it is the version I know and it's handy to have a recipe for shortcrust pastry anyhow.

SWEET SHORTCRUST PASTRY
250g (1 2/3 cups) flour
75g (1/3 cup) sugar
1/8 teaspoon salt
1 -2 T almond meal (optional)
125g (generous 1/2 cup) room temperature unsalted butter
1 large egg
1 shot dry white wine (optional)
GLAZE
1/4 cup apricot jam
1/2 T water or spirit like Rum, Cognac or Calvados
APPLES
500-680g apples (3 large or 4 small apples / about 1 1/2 pounds) You can use any firm textured apple. Granny Smith apples are very nice.
2 - 4 T (25 - 50 grams) sugar to caramelise (optional, depending on sweetness of apples)
2 T (26 grams) unsalted butter
CUSTARD
200ml (generous 3/4 c) creme fraiche
75g (1/3 c) sugar
2 eggs
1/2 t vanilla paste / pure vanilla extract
CINNAMON SUGAR (optional)
1 T (15g) sugar
1/4 -1/2 t cinnamon
Method
Pastry:
(If you don't have a mixer you can use clean hands and just make sure you chill it well before baking as pastry should be cold going into oven).
Place the butter in your mixer and beat until softened. Add the sugar and beat until light and fluffy. Gradually add the egg and wine, beating just until incorporated. (Don't over mix or the butter will separate and lighten in colour.) Add flour, almond meal and salt and mix just until it forms a ball. (Don't overwork or pastry will be hard when baked.) Flatten dough into disk, cover with plastic wrap, and refrigerate about one hour or until firm.
Have ready an 20-25cm (8 - 9 inch) tart pan (preferably with removable bottom). On a lightly floured surface, roll out the pastry into a 30cm (11 - 12 inch) circle that is about 3mm (1/8 inch) thick. To prevent the pastry from sticking to the counter and to ensure uniform thickness, keep lifting up and turning the pastry a quarter turn as you roll (always roll from the centre of the pastry outwards to get uniform thickness).
When the pastry is the desired size, lightly roll pastry around your rolling pin, dusting off any excess flour as you roll. Unroll onto top of tart pan. Never pull pastry or you will get shrinkage (shrinkage is caused by too much pulling of the pastry when placing it in the pan). Gently lay in pan and with a small floured piece of pastry, lightly press pastry into bottom and up sides of pan. Roll your rolling pin over top of pan to get rid of excess pastry. With a thumb up movement, again press dough into pan. Prick bottom of dough (this will prevent the dough from puffing up as it bakes). Cover and refrigerate for about 20 minutes to chill the butter and to rest the gluten.
Preheat oven to 205 degrees C (400 degrees F) and place rack in centre of oven. Line the unbaked pastry shell with parchment paper or aluminium foil. Fill tart pan with pie weights or beans, making sure the weights are to the top of the pan and evenly distributed over the entire surface. Bake crust for 20 to 25 minutes until crust is dry and lightly browned. Remove weights and cool crust on wire rack.
When cool, spread a thin layer of warm apricot glaze over the bottom and sides of the tart to seal the crust and prevent it from getting soggy. Let the glaze dry between 20 - 30 minutes.
Glaze:
In a small saucepan heat the apricot preserves until boiling. Remove from heat and strain to get rid of lumps. Add the Cognac or water.
Apples:
Peel, core, and slice the apples into 1/4 inch thick slices. Melt the 2 tablespoons (26 grams) butter in a large frying pan over medium heat and stir in the 2 - 4 tablespoons (25 - 50 grams) sugar. Add the apples and saute until they begin to soften, approximately 5 - 10 minutes. Set the cooked apples aside.
Custard:
In a separate bowl, put creme fraiche, eggs, sugar, vanilla paste/extract and mix well.
Assemble Tart:
Preheat oven to 180 degrees C (about 350 degrees F) and place rack in the middle of the oven. Arrange the apple wedges in concentric circles on top of the cooled and glazed tart shell. Carefully pour the custard over the apples to just below the top of the tart pan (do not fill all the way or the custard will drip between the crust and the pan). Sprinkle lightly with the Cinnamon Sugar.
Place tart pan on a larger baking sheet to make it easier to remove from oven and bake for about 20-30 minutes or until the custard has set.
Let the tart cool on wire rack, then lightly sieve powdered sugar over the top. Place the tart under the broiler in the oven just long enough to caramelise the sugar on the apples. To prevent the edges of the tart shell from over-browning, you can cover them with a thin piece of aluminium foil. Be careful not to over brown.
To remove the tart from the fluted sides of the pan, place your hand under the pan, touching only the removable bottom not the sides. Gently push the tart straight up, away from the sides. The fluted tart ring will fall away and slide down your arm. If you want to remove the bottom of the pan, run a knife or thin metal spatula between the crust and metal bottom, then slide the tart onto a cardboard cake round or platter. (NB when I made the tart shown in photo I had already packed up my pie dish so had to make do with what I could find - this pan with no handles. I just let it cool in pan and cut slices directly from that with a cake slice)

Serve with softly whipped cream or vanilla ice cream. Remember to share! It is very rich and deliciously unsuitable for diets.
Makes 1 x 20-25cm (8 or 9 inch) tart. (That's about 8-10 slices)
Sunday, June 24, 2012
Mrs Doubtfire (Recut trailer)
A creepy premise, Mrs Doubtfire. This recut gives it a more fitting genre....
Plot Synopsis: An unemployed actor undergoes a drastic transformation in a twisted attempt to regain the trust of his estranged family.
Plot Synopsis: An unemployed actor undergoes a drastic transformation in a twisted attempt to regain the trust of his estranged family.
Mrs. Doubtfire (Recut) from Peter Javidpour on Vimeo.
Saturday, June 23, 2012
Jaeyeol Han Portraits

Jaeyeol Han is an artist I met doing a life drawing class in Seoul years ago. Needless to say it was intimidating being surrounded by animators and young artist students like him, with his incredible drawing skills. While I was struggling to get anything even in proportion let alone with any flair, in the seconds we had for each pose he would be churning out both realistic and muscular stylised figures.
After majoring in painting, he's been working a lot on portraits - also my favourite subject matter. These portraits have a sense of urgency about them but are delivered from eyes trained to observe acute and subtle emotions caught in a moment. Some I have more of an immediate connection with than others and several I would like to purchase (you can arrange to buy by emailing him - after spending some time living in Ireland, where he had his last show, his English is pretty good). His next show, in Seoul, is in September and details are on his website:
Jaeyeol Han's website
Check out his website for his virtual gallery of more portraits in this series.


Here is the video these stills are captured from:
Thursday, June 21, 2012
Camélia Jordana - Non non non non
In honour of the Fete de la Musique, held all over France, and at our local bowling club (where the Frenchies play les boules), here is a French pop song that's been stuck in my head lately. The singer was on the French idol/talent/star quest show when she was just a geek-chic bespectacled 16 year old and she's all of 19 now.
First just the tune was catchy, but paying attention to the (simple) lyrics and then the cheesy 'Glee' kinda music video I liked it even more; it reminded me not so much of post break-up cheer-up attempts by friends but more of that feeling of just being in the wrong mood at a woo-hoo!-fun party - everyone else all chipper (Did I mention there's a funeral home called 'Chipper Funerals' here?) and me just being unable to get in that dancey mood. A song like this might have changed all that.
in case you feel the need to sing too -
Camélia Jordana - No no no (listening to Barbara)
How many times shall I
Courteously tell you
I don't wanna go out to the Baron club
No, no, no, no
I don't wanna get some fresh air
No, no, no, no
I don't wanna have a drink
No, no, no, no
I don't wanna forget about him
No, no, no, no
I don't wanna do without him
I only wanna
Feel bad and there's nothing wrong in that
Hanging around, eating nothing at all
Listening to Barbara
Maybe he will come back
No, I don't wanna take a turn
What's the need to take a turn
No, I don't wanna get rid
Of this so beautiful hell
That I'm starting to like
I don't wanna leave my lounge
No, no, no, no
I don't wanna get some fresh air
No, no, no, no
I don't wanna have a drink
No, no, no, no
I don't wanna forget about him
No, no, no, no
I don't wanna do without him
I only wanna
Feel bad and there's nothing wrong in that
Hanging around, eating nothing at all
Listening to Barbara
Maybe he will come back
No , I don't wanna feel better
What's the need to feel better
No, I don't wanna get dressed
Don't wanna put make-up on
Let me be bored
Stop your questions
No, no, no, no
I don't wanna get some fresh air
No, no, no, no
I don't wanna have a drink
No, no, no, no
I don't wanna forget about him
No, no, no, no
I don't wanna do without him
I only wanna
Feel bad and there's nothing wrong in that
Hanging around, eating nothing at all
Listening to Barbara
Maybe he will come back
.
Sunday, May 20, 2012

Sunday, April 15, 2012
Henri
or as I like to think of him, Gobbolino, the French philosopher's cat.
Apparently the French in this is bad - but the idea is rather good. An experimental short film for the cat-video generation(s).
Apparently the French in this is bad - but the idea is rather good. An experimental short film for the cat-video generation(s).
Friday, April 6, 2012
Etsiz Turlu Rich Vegetable Stew

We've got slightly colder nights now and that, combined with a surprising lack of enthusiasm for cooking this past week had me turning to this stew from 'Vegetarian Dishes from Across the Middle East".
I've made it before so know how simple yet flavoursome and satisfying it is. Just a couple of spices and some butter serve to enrich, not suffocate, the flavours of the vegetables which, especially if they're organic, develop nicely with simmering. I didn't use the water he suggests in this recipe as I thought the tomatoes and zucchini provided sufficient liquid.
Etsiz Turlu Rich Vegetable Stew
The vegetables vary with the seasons and also with your own preferences. In this stew anything goes! It makes a filling meal on a cold winter's day when served with a pilaff of your choice.
This recipe makes a lot but I use it more as a reminder of the types of vegetables that suit stewing and the spices he suggests. I just looked in the fridge for what we had - a nice selection of seasonal veges from our organic delivery - apparently blue carrots are in season so this and lots of our recipes are a bit on the purplish-side at the moment. I made an easy pilaf in our rice cooker while this was simmering. Recipe for that below.

Serves 6-8.
2 large eggplants
1/2 c (4 oz) butter
1 green pepper, seeded and cut into 8 pieces
2 zucchini, sliced into 1 1/2 inch pieces crosswise
2 large potatoes, peeled and each cut into 8 pieces
2 large tomatoes, blanched, peeled and quartered.
2 large onions, quartered
4 oz okra, stems trimmed
4 oz french beans, trimmed and halved
3 cloves of garlic, finely chopped
2 T coarsely chopped fresh parsley
2 turnips, peeled and quartered
2 sticks of celery, cut into 1 inch pieces
2 bay leaves
1/4 t dried basil
1/4 t dried dill weed
1/2 t sumac (optional)
1/4 t ground cumin
1/2 t cayenne pepper
1 1/2 t salt
1/2 t or more of black pepper
2 T butter
Slice the eggplants crosswise, arrange on a large plate, sprinkle with salt and leave for 30 minutes.Meanwhile, prepare all the other vegetables as suggested.
Melt the butter in a very large saucepan or casserole, add all the vegetables apart from the eggplants, and stir well for a minute or two until coated with the butter. Add about 3 3/4 cups of water, the bay leaves and the remaining herbs and spices and stir thoroughly.
Rinse the eggplants under cold running water and dry on water towels.
In a frying pan, melt the 2 T butter, add the eggplant slices and fry for a few minutes, turning occasionally. Add them to the other vegetables, bring to a boil, cover the saucepan tightly and simmer about an hour - carefully turning the vegetables a few times - or until the vegetables are tender.

Rose's pilaf
Serves 4
In a rice cooker, melt 1-2 T butter and add 1-2 finely chopped spring onions. Saute, with a pinch of saffron threads. Thoroughly wash 1 c rice, add this into the rice cooker and stir to coat with butter and spring onion. Let this heat a little while you grind the spices: In a mortar and pestle/spice grinder, smash 4 cardamom pods to open. Shake seeds in mortar bowl and discard shells. Add 3 or 4 allspice nuts and 1 whole clove. Grind these three spices together and add to rice mix. Cover with water to about 1 inch above level of top of rice. Put lid back on rice cooker and go do something else while stew and rice cook! Even if you leave this a bit too long the rice cooker will have switched to 'keep warm' and if you leave it on that for a while the bottom can go a nice golden brown and a bit crispy - I love that!
Friday, March 30, 2012
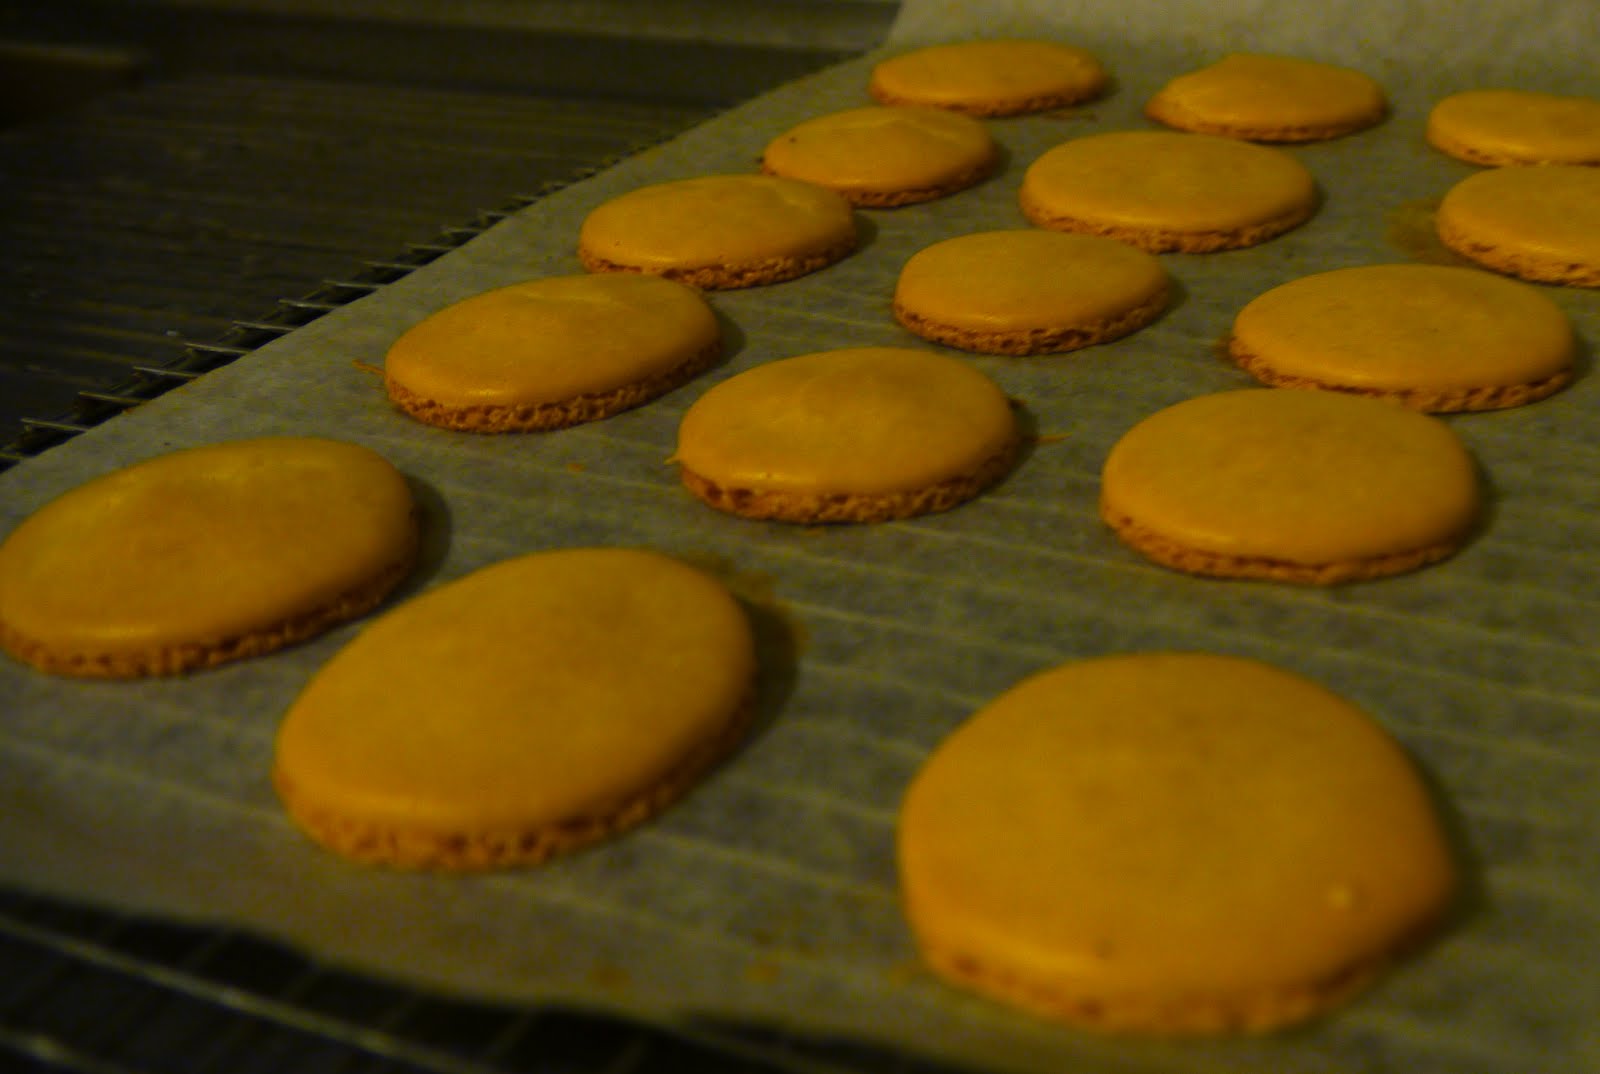
Macarons

These almond meal and meringue based cookies are all girly decadence. But being just bite-sized and also flourless, they will please almost everyone, including gluten-intolerant people! The filling possibilities are just about endless so go get creative and wait for the 'Oh la-la!'s to roll in!
Recipe includes fillings for the five flavours I made: Honey on Toast, Raspberry Chocolate, Orange and Lemon curd, Spearmint and Manuka, Apple Pie. As well as these I have added a recipe for a favourite flavour, Salted Caramel, and made some other filling suggestions for you to try.
Working in a patisserie was less fun than I thought - I wasn't one of the cooks, you see. Watching the chefs at work was certainly fun though and I was inspired to try making macarons for the first time. I don't have a commercial kitchen at home nor did I want commercial quantities so I used recipes from a book I own, 'The Secrets of Macarons' by Jose Marechal, and also from the recipe recently featured on the TV show 'My Kitchen Rules' - Thanks Nick and Rocco!
Even when not making commercial quantities these cookies they can take some time! They're perfect for when you want to spend an afternoon baking (Unless you're a Nick or Rocco and can make them in 1 1/2 hours from wo to go). I was more keen on the pleasure of making the macarons than eating them as I've been restricting sugar and such for lent and have got used to enjoying sweet treats as eye-candy! So try these pretty biscuits and enjoy sharing them with friends. Such petite bites are a perfect little treat - or package them nicely for a dainty gift!
Macaron Shells
Makes about 45 macarons (90 halves)
200g caster sugar
75ml water
4 egg whites
200g almond meal, sifted
200g (1 1/4 cups) icing sugar, sifted
Gel food colourings to match/complement filling flavours

1. To make macaroons, preheat oven to 200C. Combine caster sugar and water in a small saucepan and simmer over low heat, stirring, for 8-10 minutes or until sugar dissolves. Heat sugar syrup until it reaches 118C (test using a sugar thermometer), brushing down sides with a wet pastry brush to avoid crystallisation.

2. Meanwhile, using an electric mixer on medium speed, whisk 2 egg whites in a medium bowl until soft peaks form. Increase speed to high, then slowly add sugar syrup in a constant stream until combined. Set aside. (My old 'SwiftWhip' hand beater worked fine but it IS tricky to pour in the sugar syrup before it cools and hardens AT THE SAME TIME AS continuing to beat - an extra pair of hands would have helped!)

3. Sieve almond meal and icing sugar into a medium stainless-steel bowl, then gradually add remaining unbeaten egg whites, mixing with a wooden spoon
until the mixture is firm and paste-like.

4. Separate mixture into smaller bowls, depending on how many colours you want. Add desired food colouring to each bowl and combine well, then divide beaten egg whites evenly between each bowl and thoroughly combine. The mixtures should have a velvety texture. I added extra eggwhite mixture after taking these photos - in fact I had too much eggwhite as my eggs were small ones and I over-compensated - hence the mix spread out and made thin macarons. Don't overmix - if you do the mix will become too runny and the macarons too thin to form their 'feet' - the ruffled bit at the bottom which is desirable as it lets the top surface stay smooth and uncracked.


5. Spoon coloured mixtures into piping bags fitted with a 1cm plain nozzle. Pipe mixture to make 3cm rounds on silicon-mat or baking paper lined baking trays. Tips:
- Make a circles template sheet by tracing a 3cm circle, from cookie cutter etc, onto a sheet of baking paper. Put another sheet of baking paper over this and you'll be able to see circles underneath and pipe to size. Then you can slide the template sheet out and use for the next tray.
- Attach baking paper to tray with wee dots of the mixture like glue. This will stop the paper curling and lifting in the oven's heat.
Tap trays to flatten peaks and rest for 30 minutes or until mixture feels dry to touch and forms a skin. This drying time is very important. If you try to cook them when the surface is still a bit sticky, the 'feet' won't form at the base and so the top will crack and they won't look pretty and smooth.


6. Reduce oven temperature to 150C and place trays in oven. Bake for 15 minutes or until bases are firm and a macaroon can be lifted from the tray. Remove trays from oven and slide the macarons-on-baking-paper onto a wet benchtop - the thermal shock will make them easier to remove. When you can separate the macarons from the paper, put them on a wire rack to cool.
7. When your fillings are ready (some will need cooling time and could be made ahead), assemble macarons.
Using a piping bag fitted with an 8 mm (3/8 inch) nozzle (or spread carefully with a teaspoon), fill half the macaron shells with filling(s). Then top with the other half of the macaron shells. Place in container (single layer or separated by baking paper) in fridge for at least an hour. They are especially good the next day as flavours have developed. You may even freeze the macarons straight after you have assembled them and thaw out when you want to use - a good idea if you're not sharing these as the recipe makes quite a few!

Fillings
NB if you don't fancy making fillings, the macaron shells are very nice on their own with a coffee or a nice cuppa.
Chocolate Ganache
200g dark chocolate, chopped
100ml thickened cream
To make ganache, melt chocolate in a heatproof bowl over a saucepan of simmering water until smooth. Add cream and stir until thickened, then cool to set.
You can add different flavours to this.
Raspberry - Make a coulis (puree) by mixing raspberries and a little sugar to taste and heating over medium heat. Strain through a fine sieve over the chocolate. Gently combine to dissolve chocolate and make ganache smooth. Cool until at suitable consistency for spreading (thick like peanut butter).
Or you can try
White chocolate
Chocolate Mint
Lemon Curd
75g (1/2 cup) cornflour
220g (1 cup) caster sugar
125ml (1/2 cup) lemon juice
310ml (1¼ cups) water
2 tsp grated lemon zest
3 egg yolks
60g unsalted butter, chopped
To make lemon curd, combine cornflour and sugar in a medium saucepan over low heat, then gradually stir in lemon juice and water and stir until smooth. Cook for 3-5 minutes or until mixture boils and thickens. Remove from heat and stir in lemon zest, egg yolks and butter. Stir until melted. Cover with plastic wrap and cool to room temperature. When ready, add to buttercream, 1 tsp at a time, to taste.
Other Fruity Jam type fillings
Save type and use a favourite jam like plum, blueberry, strawberry etc
Buttercream
180g caster sugar
125ml (1/2 cup) water
3 egg yolks
300g unsalted butter, diced, softened
To make buttercream, you can go easy or complicated. I used the long recipe here but I reckon it would have worked just about as well saving a lot of hassle to just cream butter and sugar and beat in egg yolks - no heating! OR this is the recipe I tried if you have enough time:
Place sugar and water in a small saucepan over medium heat and stir for 8-10 minutes or until sugar dissolves. Brush sides of saucepan with a wet pastry brush to avoid crystallisation. Boil to 121C (test using a sugar thermometer).
Meanwhile, using an electric mixer on high speed, whisk egg yolks in a medium bowl until thick and pale. Reduce speed to medium and gradually pour in sugar syrup in a thin, steady stream. Whisk for 5 minutes, then add butter 1 piece at a time and whisking after each addition, until combined. Divide mixture between however many bowls to make the different flavoured fillings (I used buttercream for 3 of my five fillings) and leave for 15-20 minutes to cool completely.
The three buttercream flavours I made:
Honey on Toast - 2 tsp of your favourite honey. I used redgum.
Spearmint & Manuka - Mix and heat 1-2 tsp of spearmint & manuka tea (or other nice tea flavour - rooibus? dandylion?) in 1-2 Tbsp of water or cream to extract flavour. Strain, squeezing out as much flavoured tea extract as possible.
Apple Pie - Mix Applesauce with a little buttercream to set it.
Other ideas to mix with buttercream:
Nut - hazelnut, pistachio etc
Coffee
Rosewater
Vanilla
Coconut
Mango
Salted Caramel Filling
250 g (9oz) Caster sugar
75 ml (2 1/2 fl oz) Water
120 ml (4 fl oz) whipping / pouring cream
200 g (7 oz) Salted butter
(You might want to add a caramel or light brown food colouring or 2 drops of yellow colouring to the macaron mix)
1. Heat the sugar and water in a saucepan, over a medium heat. Without stirring too much, watch over the sugar until it becomes a lovely light brown caramel colour.
2.Next add the pouring cream, little by little, gently stirring with a spatula to stop the caramel cooking any further. The caramel will foam up and can burn. Watch out for splatters - hot sugar is dangerous! It might pay to wear long sleeves and use a splatter-guard.
3. Once the cream is well incorporated into the caramel, put in the thermometer and monitor the temperature. Once it reaches 108 celsius (226 F), remove from the heat and add the butter in small pieces. Beat or whisk until the caramel is smooth and even.
4. Pour caramel into suitable container and chill in the fridge for at least 1 1/2 hours so that the caramel thickens.

Wednesday, March 28, 2012


Tuesday, March 20, 2012
Zoufris Maracas - Et Ta Mère
Catchy song even without understanding it. And music video reminds me of a Kusturica film. Except less so. And Kusturica films are all about the more.
I've just discovered this song, and many other fine ones on the horribly named (but surprisingly good) 'So Frenchy, So Chic' soundtrack to the 2012 French Film Festival. I do love a good soundtrack.


Thursday, March 1, 2012
Loubia bi Harissa Fettuccine

This 'Fiery Green Beans' dish was meant as a side dish. But I'm not usually motivated enough to make several dishes for a meal so I turned it into a main by serving it as a pasta dish. It coped admirably.
The recipe comes from one of my newest and worst titled cookbooks, "Veggiestan: a vegetable-lover's tour of the middle east" by Sally Butcher. Ironic surname on a vegetarian recipe collection but I hope neither of us have butchered middle eastern flavours too much with our reinterpretations.
Serves 4 as a vegetable side dish (or 2-3 as a pasta main)
300g (10 1/2 oz) French or runner beans
butter, for frying
1 red onion, finely sliced
8 cherry tomatoes (or more, why not?)
3 garlic cloves
juice and zest of 1 lime
1 tsp of rosewater
2 tsp of harissa paste
5 Tbsp olive oil
"Top and tail your beans, and de-string them if you're using runner beans. French beans should be cut in half, runners cut on the diagonal into 5cm (2") striplets. Now blanch them in boiling water for about 4 minutes and set to drain.
Heat a knob of butter in the pan and throw in the onion: once it has softened, add the tomatoes and garlic, turn the heat down and leave them to sweat a little. After about 5 minutes add your green beans and sweat stuff a little more before taking it off the heat.
Whisk the rest of the ingredients together. Check the seasoning - you may need to add salt, although harissa paste is usually well seasoned. Stir the dressing gently though the beans and then leave the whole thing to cool. You can serve this hot or cold, but it is undoubtedly at its best at room temperature or above. Green beans have never been so exciting"
I served mine over fettucine and it made a well balanced vegetarian main.
Subscribe to:
Posts (Atom)